Man In The Maze

by Rich Luhr, Editor of Airstream Life magazine

  • About
  • Follow
    • Twitter
  • My books
    • Exploring National Parks
    • Newbies Guide To Airstreaming
    • Airstream trailer maintenance guide
  • “How To Airstream” blog
  • Store
  • Back to Airstream Life
You are here: Home / Archives for Airstream / Maintenance / Renovation

Jun 30 2016

Refurbishing the Hensley hitch

Remember last November when we found a crack in the Hensley hitch?  We took it to a local welder in Del Rio TX and got a quick fix on it.

Well, of course that wasn’t the end of the story.  For years I’ve been saying that the hitch was due for a complete overhaul, so I took the opportunity this summer while the Airstream is parked in Vermont.  I removed the hitch and toted it across Lake Champlain to Colin Hyde Trailer Restoration.

That poor hitch was looking pretty awful.  The orange paint flaked off a long time ago, and I’ve been patching it periodically with silver spray paint. It was a patchwork of rust, flaking paint and grease. From prior experience I knew it would have a broken internal bushing (the “binocular” part) and during inspection Colin and I spotted elongated holes in various places.

Hensley broken binocular bushingsSo I called up Hensley and ordered every part that was worn or which might fail in the future, which included 8 bearings, the “binocular” bushings, some new U-brackets, dust caps, spare zerk fittings, and even a full sticker kit so we could make it look like factory-new again.  That was about $250 in parts (they threw in the stickers for free).

Hitch ball no greaseNow, Hensley doesn’t have a recommended service interval, so owners are left to their own judgement as to when an overhaul is due. I think I waited too long. It has been seven years and certainly well over 70,000 miles of towing since we got this unit (itself a replacement).

Colin called me a couple of days later to say that mine was “the worst” Hensley they’d ever seen. Apparently the battered nature of my hitch was the subject of some amusement over at the shop.

The bushings were broken not just once as expected, but into three separate pieces.  The chrome had been worn off the hitch ball.  One of the lower bearings had rusted (due to water intrusion through the dust cap).

Hensley lower cracksThat crack we thought we’d fixed?  Now it was three separate cracks running across the bottom unit, hidden by a layer of dried grease.

Worst of all, the tubes that accept the binocular bushings and weight transfer bars had stretched. Now they are oval, to the tune of about 1/10 of an inch and they have separated from the main body. The new bushings won’t even fit in.

So, after Chris spent some time at the shop degreasing and sandblasting away endless layers of paint, it was decided that the entire lower section of the hitch needed to be sent to Hensley for warranty repair.  They received it this week, and have promised I’ll get it back well before it’s time to hit the road in later July.

Hensley disassembledColin says they’ll take one look at it and decide to melt it down, but I think Hensley will repair it. It will be interesting to see what comes back.

Meanwhile Colin’s guys will continue working on the rest of the hitch. There’s really not much left of it, once we figure in all the new parts I bought, and the replacement lower unit.

We’ve decided to restore the famous Hensley orange paint (but a better, longer-lasting version, says Colin).  I have some suspicions about that too.  I figure it’s all a learning opportunity.

For now there’s nothing to do but wait. Assuming everything goes as planned, we’ll have the hitch reassembled and ready in late July, just in time for us to launch again across the country.  Our schedule calls for departure before August 1, in order to spend six weeks transiting the north country from Vermont to Seattle WA. It will be nice to take off knowing the hitch is back up to 100% again.

Written by RichLuhr · Categorized: Airstream, Maintenance, Renovation

Jun 23 2016

Major work: a new front end & other repairs

OK, brace yourself.  This post is going to get detailed, forensic, and possibly scary to the faint hearted.  We’re going to do surgery on the Airstream.

Let me start with a little about how a modern Airstream is put together.  The aluminum body rests on a steel frame (or chassis) and is fastened down around the perimeter to that chassis. This is “semi-monocoque” construction, which is normally pretty strong.  The body and the chassis work to support each other, and as long as they are well tied together everything goes well.

Now think of the Airstream’s body as a teeter-totter, with the axles being the fulcrum.  In normal towing the rear of the trailer is bouncing up and down on the road a little. With every bump, as the rear goes down, the front end is being pulled upward from the chassis. Since the chassis of the trailer is held down at the front by the tow vehicle, there’s a lot of strain on the chassis-body connection.

The longer the trailer, the more force is put on the front end. When the attachment between chassis and the front of the body loosens, that’s “front end separation.” Essentially the body is now banging on the chassis rather than being firmly tied to it. As separate units, the body and chassis are now both weaker and they start to beat each other up. The visual symptoms are things like broken rivets, stress cracks in the body, mangled aluminum and gaps around the lower edge, and other things.

Now before you panic, let me point out emphatically that all Airstreams (and for that matter, all RVs of any type) will normally flex some as they travel.  They can even flex a little when they are parked if you crank the stabilizer jacks too much.  So some movement is good–it’s a way to distribute stress across the body structure.  Airstreams are not designed to be rigid, just like a bridge or the wing of a jet.  If the wing of a jet couldn’t flex in turbulence, it would just break off.

But separate movement of the body and chassis means problems. Longer trailers are particularly likely to have this problem, and they often have a particular symptom when they are flexing too much at the front end: they develop a fatigue crack in the skin just above and forward of the entry door.  On 30-foot bunkhouses like ours, the cracks first seem to appear at the corners of the front compartment hatch–and other places, as we discovered.

The 2004-2006 bunkhouses had what I consider to be a design flaw: a large square-edged front compartment.  The hatch for this compartment created a weak spot in the body, and it also eliminated the possibility of designing a structural attachment in the front center of the body where stresses are high.  (The shape of the opening is also relevant. Airstream has since gone back to rounded corners on exterior hatches and my guess is that this is part of the reason. Square corners are weak points.)

For years Colin Hyde, of Colin Hyde Trailer Restorations, has been pointing at our trailer and two tiny cracks by our front hatch, saying “You have front end separation.”  This became a sort of game.  I would deny it, and then he’d say, “You just don’t know it yet.”  Although I could not admit this to Colin, I knew he was right and that someday we’d have to go in there and find out how bad it was.  This week became “someday.”

Airstream front hatch ext before

Here’s a photo at the beginning of the project.  The front wrap protectors have been removed along with the lower beltline trim and the hatch door.  With the door removed, it’s more clear how little structure existed to spread out stresses that are transferred from the main frame members (A-frame) through the body.  The circles show the approximate locations of cracks that appeared, and the red lines show theoretical lines of stress.

The front is a high stress area, so in older Airstreams there’s sometimes a steel plate installed that extends upward from the chassis to the front panel of the aluminum body, connected by two or three rows of rivets.  Obviously that wasn’t possible with this front hatch design.  We struggled with leaks through this compartment because the door fit differently depending on whether the trailer was hitched up or not, and also the door would jam shut when the weight bars were tightened.

Airstream stoneguard mount crackAirstream stoneguard cracks2Airstream stoneguard mount repair

These two photos show cracks we didn’t know about until the front wrap protectors were removed.  This is the mounting point for the wrap protectors. Both mounting points (on opposite sides of the trailer) had the same cracks because they were weak points. The cracks are the result of metal fatigue from repeated flexing.

These cracks were definitely letting rainwater in, which is of course the cause of floor rot, so it was yet another reminder of how serious the side effects of front end separation can be.  The cracked spots were fixed with a new aluminum plate and sealant, as shown in the third image.  But this was only treating a symptom.  The real problem was down where the body and chassis were joined.

Airstream reinforcement failure

The photo above shows a reinforcement that was installed in 2008 by a dealer’s service center. They basically slipped some cut aluminum behind the existing exterior skin around the hatch in the hope of adding strength to the corners of the door.  You can see how well that worked: completely cracked through. This patch basically replaced a weak spot with another weak spot—and again, it was only treating the symptom.  It didn’t do anything to strengthen the body-chassis connection.

To fix this right, we made the tough decision to eliminate the hatch entirely.  This would allow Colin’s guys to fabricate and install two additional ribs, and attach those ribs to the existing ribs plus the new steel frame plate and a single sheet of aluminum on the inside and outside.  In other words, we were replacing a big hole and 16 rivets with a battleship-like sandwich of aluminum, steel, and 160 new rivets.

Airstream front hatch interior before

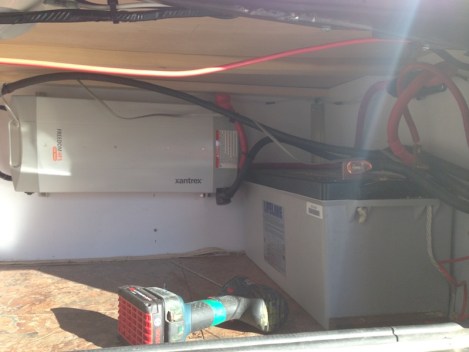
I pitched in a little by removing the front bed and frame, lower curtain track, and all our personal stuff.  This left only the big Lifeline 8D AGM battery and the Xantrex Freedom HFS converter/charger/inverter that we installed in January, plus some wiring.

The different colored floor tiles at the front end were installed way back in March 2006 when the front compartment first began leaking. Since we now had everything out, this was a good chance to remove those tiles and finish the floor with walnut (vinyl) flooring to match the rest, so I ran out to Lowe’s and bought a box of planks and installed them.

Now, compare that photo above with the one below.  Notice the two new ribs coming all the way down to the floor where the compartment used to be, and the black steel plate with three rows of rivets firmly attaching it to the body and ribs.  That plate is welded to the steel frame below.  It takes the stress between the body and chassis and distributes it, rather than concentrating it on a few weak spots. That’s the key: you can’t eliminate the stress, so you spread it out instead.

Airstream steel frame plate interior

The photo below was taken a little earlier in the process.  It shows how the steel frame plate was welded to the frame.  Notice that in our case we chose to remove the old battery box that hung between the frame members.  We weren’t using it, and it was in the way.

Airstream steel frame plate ext

The next photo shows the exterior work nearly done.  Joe is bucking rivets with Chris (inside).  Buck riveting is a two-man job and it requires access to both sides, which is why Olympic-style rivets are often used for exterior repairs.  But buck rivets are far stronger.  Notice five rows of rivets horizontally (four on the steel frame plate and one at the aluminum panel joint above) and four vertical rows added to the ribs (plus two vertical rows that were pre-existing and two rows for the vertical aluminum panel joint).  Seriously strong.

Airstream front end new rivets

Airstream new bedroom floorThe blurry photo at right shows the interior when done.  We didn’t put the white fuzzy Ozite fabric back, as we aren’t really in love with the stuff, and opted instead for a single sheet of aluminum.  The new flooring is in place also.

By this point I had been living in Colin’s parking lot for three nights, and we still had a lot of problems left to solve.  For one thing, we no longer had access to the storage space under the head of the bed.  Also, I wanted to muffle the fan on the Xantrex, since it’s right under Eleanor’s head and it runs when the converter is bulk charging the battery.

The solution was a pair of new hatches.  We divided the compartment with a 1/2″ plywood bulkhead.  The left hatch contains the battery and Xantrex; the right side is “dead storage”.

Airstream bed hatches

The battery is now secured with two big straps.  If we have a catastrophic accident, it won’t go flying and possibly short against something (which could cause a fire).  Also, since the battery no longer shares space with any stored items, we’ve eliminated the chance that some metallic object might accidentally contact the positive lead on the battery (which would cause a huge spark at the very least).

Airstream soundproof compartment

To soundproof the compartment, I lined it with acoustical foam used in recording studios.  On the underside of the bed platform (the hatch) I layered the foam over heavy automotive sound-deadening material.  We will have to pull the mattress out entirely to access this compartment, but since there are no routine maintenance items in there, it shouldn’t need to be opened very often.

You can see in an earlier photo that the right side hatch is much smaller.  We designed this so that we could simply slide the mattress toward the bedroom door to expose this hatch.  There’s a piano hinge at the very front edge. Lying on the bed, it’s easy to put things into the compartment below.  We will continue to use this as dead storage for things we need only rarely.  Funny thing is, it’s easier to access now than it was through the old front hatch, and so I was able to pack everything we were carrying before into a space half the size!

Obviously this was a big job.  But we got a ton of benefits from it:

  • eliminated leaks at the front hatch and at cracks on the body
  • eliminated possibility of future stress-related problems stemming from front end weakness
  • quieted the inverter fan
  • front storage is more usable and accessible
  • battery is much better secured
  • eliminated potential electrical risks at battery
  • cosmetics: got rid of stained Ozite, finished flooring, eliminated cracks at exterior hatch
  • much more stable bed platform

There’s even more that we did in this service visit at Colin Hyde Trailer Restorations, but I’ll wait for the next blog to talk about that.  Just a hint: it’s a really cool improvement that I don’t think anyone else has.

Written by RichLuhr · Categorized: Airstream, Renovation, Upgrades

Jan 13 2016

The inverter

One of the nice things about having a well-seasoned Airstream (that’s a euphemism for “older”) is that I get to upgrade things (that’s a euphemism for “get new toys”) using either repairs or “testing” as the excuse.  For years I’ve wanted a really nice inverter so that we’d have AC power for things like Eleanor’s coffee maker when we are boondocking, and this week we finally got one.

An inverter, for those who aren’t sure, is simply a device that turns the battery power (12 volt DC) into the type of power you’d get from a plug in your home (120 volt AC).  Garden-variety inverters that plug into cigarette lighter sockets are pretty cheap and we already had one of those, but they aren’t great.  Instead of producing nice clean smooth electrical current, they produce a sort of choppy electricity that makes some appliances hum and buzz. The TV and the chargers for our Macbooks particularly don’t like it.

Moreover, the plug-in inverter we have been using isn’t powerful enough. It is rated to produce 300 watts of power, which is plenty for the TV, but hopeless for something like a coffee maker, stick blender, hand mixer, toaster, vacuum, or microwave—all of which we have in our Airstream.

So my dream was the ultimate: a “whole house” inverter capable of producing 2,000 watts of utility-grade power at every outlet in the Airstream. Not only would we be able to recharge myriad AC devices (Nintendo game, electric toothbrush, camera batteries, cordless drill, etc) but would be able to—oh miracle of miracles—warm up leftovers in the microwave.  You might think that’s a joke, but I love eating leftovers of the things Eleanor makes. It has always been one of the great tragedies of our camping style that I can’t do that when we are off-grid.

When I was at the annual RV industry convention a few weeks ago the guys at the Xantrex booth told me about their new product, the Xantrex Freedom HFS Inverter/Charger.  They shipped me one for evaluation and I couldn’t wait to get it installed in the Airstream.

Problem was, I felt the installation was a bit beyond my abilities.  I had no trouble installing their Xantrex TrueCharge2 last April but the inverter required making some really huge cables and doing other things that I didn’t have tools for, so this time I opted to take it to Quartzsite to go see Solar Bill.

We last visited Solar Bill in January 2010, to have a big Lifeline 4D battery installed.  These days he’s across the street from where he used to be, but Bill is still the same friendly and chatty guy he ever was, still happily installing solar panels, charging systems, battery banks, and similar stuff after 37 years in the business.

IMG_5788The installation was pretty smooth, and Bill’s tech was pretty impressed with the Xantrex HFS (he hadn’t seen one before because it’s a new product). We put it in the front storage compartment next to the battery, because you always want the shortest possible DC wiring run from the battery to an inverter.

Our first test was a failure.  I turned on the inverter, fired up the microwave, and everything was fine for about 10 seconds. Then the battery faded and the inverter shut off. Turns out our battery was just not up to the task, after six years of use. Time for a replacement.

They didn’t have any Lifeline 4D (or equivalent) batteries in stock and we were itching to get to Death Valley, so I decided to upgrade to the Lifeline 8D. It’s not twice the battery as the name implies, it’s about 20% more capacity.  Also 20% more weight, bulk, and cost.

Our front compartment is now carrying 165 pounds of battery, but don’t worry, it’s still not overloaded.  The battery sits atop a very sturdy part of the frame and since we aren’t carrying anything in the original battery box (which is mounted further forward on the A-frame) the net impact on tongue weight compared to the original spec is minimal. If this sounds like gobble-gook, just trust me, it’s fine.

The upshot is that now we can run laptops, kitchen appliances, and yes even the microwave oven when we don’t have an electrical hookup.  It’s amazingly cool. In fact, the microwave oven runs better than it usually does on campground power. That’s because the Xantrex HFS produces a perfect 120 volts all the time, whereas we usually find campground power sags to 114-116 volts under load.

Of course there’s a price to be paid for this convenience.  Making a pot of coffee requires about 5% of our usable battery capacity. Running the microwave really burns the electrons at the rate of about 2% of our battery every minute. So we have to be judicious about how much of this luxury we enjoy.

The inverter just got put to the test.  We headed to Death Valley for four nights to camp, completely free of hookups, with our friends Kyle, Mary, and Kathryn. Besides being a great trip, it was the perfect environment for an inverter.  We ran nearly every AC device we have, and recharged the batteries daily from the sun. At the end of the four days, we still had 69% of our usable battery capacity left.

We’re now heading to the Los Angeles area, where we’ll boondock for another three days by the beach.  So far I’m impressed with the Xantrex, but I’ll put my full report in an upcoming article at Outside Interests.

Written by RichLuhr · Categorized: Airstream, Renovation

Jun 05 2015

Something useful and beautiful

I’ve always had mixed feelings about our 2005 Airstream’s awning.  The awning is a unique feature for travel trailers. If you don’t have one, you might not understand how its value goes far beyond providing shade. I know when we got our first Airstream (which didn’t have an awning) I didn’t really see the value in them.

Then we got this 2005 Airstream Safari bunkhouse, and it came with a massive (21 foot long) Zip-Dee awning.  I unrolled it for the first time and was struck by the impact of it: instantly creating a welcoming space outside the trailer where before there was nothing. Suddenly I wanted to get a few chairs and table, perhaps a cooler of icy drinks, and sit out there all day watching the sun set.  Then, like a lot of Airstreamers do, turn on a decorative lamp for the evening and have dinner with some friends.

All that inspiration from a big piece of fabric overhead.  Who’d have thought it would transform a patch of gravel into an outdoor living room?

A-B Airstream morningThe only problem with this inviting tableau was the color of the awning.  Airstream was installing a dark gray awning on most Safaris at that time, which I didn’t like at all.  To me, an awning should be colorful and a little festive. The gray was monochromatic and tended to get hot in the sun, generating a layer of warm air underneath that inevitably got sucked into the trailer through the entry door screen.

But awning fabric is expensive, so I ignored the dullness of the fabric for a decade, although I winced inwardly a little every time I had to deploy it.

About five years ago when carpenter ants nested in the awning and chewed a few holes in it, I considered replacing the fabric. But that Sunbrella fabric is tough stuff and the rest of the awning was fine, so instead I called Zip-Dee and they sent me a swatch of replacement fabric to match patches. Eleanor and I cut it into squares with some pinking shears and attached the patches with fabric glue.  (Zip-Dee recommends clear silicone caulk, which works well too.)

Those patches were holding up well right up to the day we replaced the fabric. We didn’t need to replace it even after 11 years of use; I just got sick of gray. We also had installed a used window awning that came with fabric that didn’t match, which gave us the final push to change both sides of fabric to something we’d really like. Eleanor and I spent some time going over the Sunbrella swatch books at Alumaflamingo in Florida last February, and settled on “Coastal Spa” #4851-0000.

Airstream new Zip-Dee awning-2

It might seem strange, but one of the reasons I was willing to go to the expense of swapping out perfectly usable fabric on both sides of the Airstream was because I trust Zip-Dee. Jim Webb, who is the president, has come to Alumapalooza every year to do demonstrations and help customers. He personally installed our window awning last year—in the dark!—and if that isn’t proof that he’s a nice guy, I can also mention that he has supported Airstream Life magazine for many years with Zip-Dee ads.

Plus, Zip-Dee just makes an excellent product. Their awnings have been synonymous with Airstream trailers for over forty years. They last forever, they are easily repairable, and the company’s customer support is superb. Plus, they are one of those rare products that are still made in America (just like Airstreams) and world class. So I felt pretty strongly that not only would Zip-Dee treat me well, but that I’d be very happy with the upgrade.

Airstream new Zip-Dee awning-1No surprise then that Jim drove from Chicago with his son Alex to personally demonstrate to an interested crowd exactly how to replace the fabric on a Zip-Dee awning, using our Airstream. In the photo you can see the old gray fabric on the ground, as Alex and Jim prepare the new fabric to slide into the awning tube. They had the job done in about 45 minutes.

I love the way the new awning reflects on the Airstream, and the patterns of light it creates below. It simultaneously feels festive, relaxing, and (to me, at least) evocative of green subtropical waters by the beach.

There are lots of upgrades you can make to your Airstream, and we’ve done most of them big ones. But I have to say, for some reason this little change is one of the most pleasing. Now I look forward to sunny days so that I can put out the awning.

At least for us, our Airstream is our second home. Periodically spending some money to make it as nice as it can be seems frivolous, until you think about why you have it in the first place. An Airstream isn’t just a convenient way to travel; it’s also a place to relax, change perspective, and simplify. Why wouldn’t we make it as enjoyable as possible?

Airstream new Zip-Dee awning-3

I subscribe to William Morris’ famous advice: “Have nothing in your house that you do not know to be useful, or believe to be beautiful.” In this case, the Zip-Dee awning is both at once, and that’s a big win in my book.

Written by RichLuhr · Categorized: Airstream, Renovation

Apr 28 2015

Scrap metal

I got an email from a friend today who was asking on behalf of her friend about a vintage Airstream she wanted to purchase. The 1960s trailer was listed for $4,500.  The prospective buyer knows nothing about Airstreams except that they’re cool. That has become the number one qualification of vintage owners lately. I don’t like saying it, but that’s a problem.

Now, don’t get me wrong. I bought my first 1960s Airstream because it was cool too. But I took a lot of time to learn about them, and shop as carefully as I could, and eventually I scored a usable model that became my learning platform. We still have it; it’s the 1968 Airstream Caravel that we no longer use but lavish attention on nonetheless.

While I wouldn’t go so far as to call it a money pit, the Caravel certainly hasn’t been an awesome investment.  Even with my attempt to learn as much as possible before buying, I still had a lot of painful lessons ahead, and they cost me plenty. As I mentioned in my prior blog, vintage trailer owners tend to sink more money into their trailers than they are ultimately worth on the open market.

The person who wanted to buy the Airstream had dreams of turning it into a rental unit, using it herself occasionally, and decorating the interior herself. That’s all good, but if you don’t have a broad set of skills, lots of time, and a well-equipped workshop, the road from a “basket case” trailer to glamping heaven is paved with glue and cactus spines.  This buyer didn’t have any of the right qualifications.

So even before I looked at the trailer in question, I could say with confidence that a vintage project probably wasn’t right for her. But to be fair, I took a look at the online photos of the trailer too.

Colin Hyde in Airstream
Colin Hyde demonstrates a slight problem with this Airstream. This one was actually restorable, although at considerable expense.

Define “disaster”: an Airstream shell that has no interior, no windows, body damage, and a rotten wood floor. That’s what most people call scrap metal. There’s hardly any value in that, even if it is a very old Airstream (and 1960s-era is not considered very old in the Airstream world).

To get started on a project like this you would first need to find a way to transport it, since with no interior and a structurally deficient floor it would be unsafe to tow.  Then you’d need a good work space for two or three years, plus a long list of skills—or a really fat wallet to pay someone else to do all the dirty work.  $50,000-100,000 could disappear easily.

And yet, this buyer was ready to plunk down 45 hundred simoleons to acquire this decaying shell of an Airstream.  That’s the power of desire, triumphing over good sense.

Airstreams are enticing, no question. So I am writing this blog to warn those who don’t know what they are getting into. If you want to get into a project, fine, but don’t buy scrap metal. When you see an Airstream with no windows or with missing roof vents, it means it has been suffering water damage for years, not to mention the ravages of rodents and insects.

Junk AirstreamThe floor will be rotten.  The frame will probably be rusted. The insulation will be compacted and riddled with rodent trails. In short, the trailer is garbage. Junk. Restorable only at a ridiculous cost.

If you want a project, buy something that is at least intact, meaning with no major body damage, still sealed against the elements, and complete with all the doors and windows. If you don’t care about the interior because you’re going to strip it out and replace it anyway, at least make sure the structure underneath is still viable.  Don’t trust the seller on this—check it out yourself or find someone to check it out for you.

If you want to go camping in the next year, or you have a tighter budget, or you are utterly clueless about anything mechanical—buy a nice used Airstream that someone has recently camped in. There are plenty of good ones on the market.  They really aren’t rare, and Airstream keeps making more of them.  Most people will be happier without the horrible learning curve of buying a junker.

To those who make a sideline business out of selling scrap Airstreams to clueless buyers for outrageous prices: you should be ashamed of yourselves. Yes, if they are willing to pay and you don’t hide anything, it’s ultimately the buyer’s responsibility. But really, do you sleep well at night? Do something positive and help people by selling worthwhile trailers. Take the junk where it belongs: the recycling center.

Written by RichLuhr · Categorized: Airstream, Musings, Renovation

  • 1
  • 2
  • 3
  • …
  • 6
  • Next Page »

Recent Posts

  • Upgrading: Bike rack
  • Upgrading: Bathroom vent
  • “How’s that Ranger tow?”
  • Time to roam differently
  • Say this over my grave

Archives

  • September 2021
  • August 2021
  • July 2021
  • November 2020
  • October 2020
  • May 2020
  • November 2019
  • September 2019
  • July 2019
  • June 2019
  • May 2019
  • October 2018
  • August 2018
  • October 2017
  • September 2017
  • August 2017
  • June 2017
  • May 2017
  • April 2017
  • March 2017
  • February 2017
  • January 2017
  • December 2016
  • September 2016
  • August 2016
  • July 2016
  • June 2016
  • May 2016
  • April 2016
  • March 2016
  • February 2016
  • January 2016
  • November 2015
  • October 2015
  • September 2015
  • August 2015
  • July 2015
  • June 2015
  • May 2015
  • April 2015
  • March 2015
  • February 2015
  • December 2014
  • November 2014
  • October 2014
  • September 2014
  • August 2014
  • July 2014
  • June 2014
  • May 2014
  • March 2014
  • February 2014
  • January 2014
  • December 2013
  • November 2013
  • October 2013
  • September 2013
  • August 2013
  • July 2013
  • June 2013
  • May 2013
  • April 2013
  • March 2013
  • February 2013
  • January 2013
  • December 2012
  • November 2012
  • October 2012
  • September 2012
  • August 2012
  • July 2012
  • June 2012
  • May 2012
  • April 2012
  • March 2012
  • February 2012
  • January 2012
  • December 2011
  • November 2011
  • October 2011
  • September 2011
  • August 2011
  • July 2011
  • June 2011
  • May 2011
  • April 2011
  • March 2011
  • February 2011
  • January 2011
  • December 2010
  • November 2010
  • October 2010
  • September 2010
  • August 2010
  • July 2010
  • June 2010
  • May 2010
  • April 2010
  • March 2010
  • February 2010
  • January 2010
  • December 2009
  • November 2009
  • October 2009
  • September 2009
  • August 2009
  • July 2009
  • June 2009
  • May 2009
  • April 2009
  • March 2009
  • February 2009
  • January 2009
  • December 2008
  • November 2008
  • October 2008

Categories

  • Airstream
  • Airstream Life magazine
  • Alumafandango
  • Alumafiesta
  • Alumaflamingo
  • Alumapalooza
  • Asia
  • Bicycling
  • Books
  • Caravel
  • Current Events
  • Electrical
  • EUC
  • Europe
  • FAQs
  • Ford Ranger
  • Ford Ranger
  • Globetrotter 23FB
  • Home life
  • Interstate motorhome
  • Maintenance
  • Mercedes
  • Mercedes 300D
  • Mercedes GL320
  • Modernism Week
  • Motorcycling
  • Musings
  • National Parks
  • Photos
  • PTX
  • Recipes
  • Renovation
  • Roadtrips
  • Temporary Bachelor Man
  • Tesla
  • Tucson places
  • Uncategorized
  • Upgrades
  • Vehicles

©2004–2015 Church Street Publishing, Inc. “Airstream” used with permission · Site design by Jennifer Mead Creative